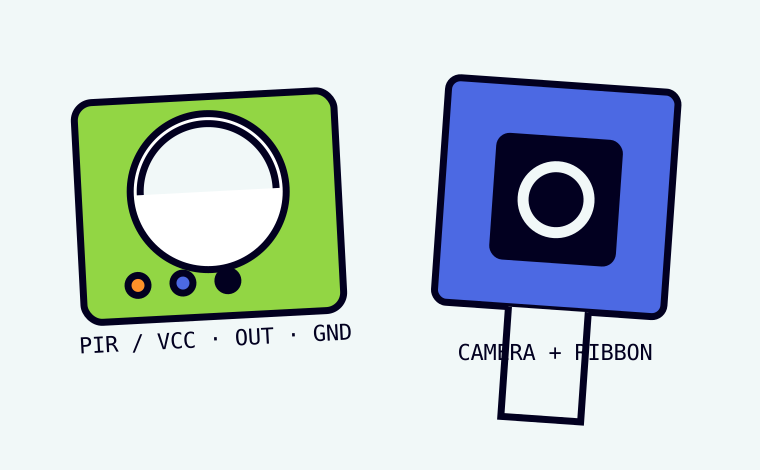
What Lucky Cam will eventually do
Lucky walks past → a PIR notices motion → Python tells the camera to take a photo → the new photo replaces the old one → a web page displays the newest image.
Lucky only
A camera in a studio needs a purpose and a boundary.
- Point the camera low at a route Lucky actually uses.
- Frame the shot so it does not capture faces, desks, doors or private work if you can avoid it.
- Test the frame before any automatic capture begins.
- Do not publish a photo containing a person just because the code worked.
Make a Cat Cam folder
- Start the Pi and wait for the desktop.
- Open File Manager.
- Open Home →
pi-projects. - Right-click an empty area → New Folder.
- Name it
cat-cam. - Press Enter, then double-click the new folder.
pir-test.py, camera-test.py, cat-cam.py, latest.jpg and index.html.Identify your PIR before wiring it
A common PIR module has a white faceted dome. We need to identify its three electrical connections.
- Pick up the PIR by its edges. Do not pull on the dome.
- Find the three connection labels printed on the board: VCC, OUT, GND.
- Point to each label before you connect a wire.
- If the labels are hidden by a plug or case, ask your tutor to help identify them.
Wire the common HC-SR501
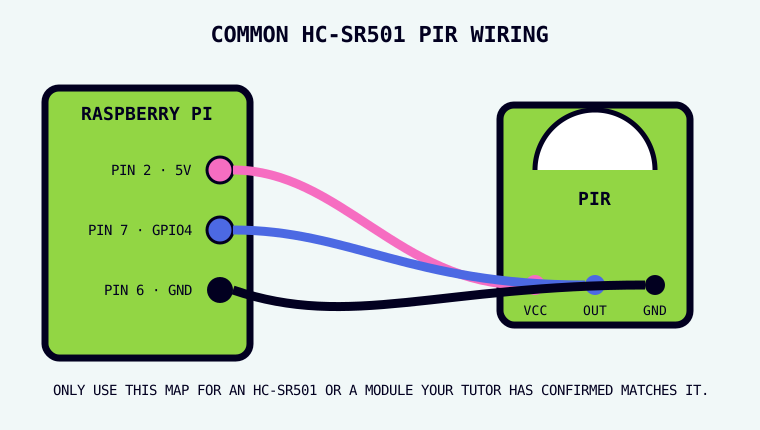
- Shut the Pi down and disconnect power.
- Connect PIR VCC to Pi physical pin 2 (5 V).
- Connect PIR OUT to Pi physical pin 7 (GPIO4).
- Connect PIR GND to Pi physical pin 6 (GND).
- Trace all three wires from sensor label to Pi pin.
- Have the wiring checked, then reconnect power and boot.
Create pir-test.py
- Open Thonny → File → New.
- Type:
from gpiozero import MotionSensor

pir = MotionSensor(4)

print("Waiting for movement...")
pir.wait_for_motion()
print("Something moved")MotionSensor is GPIO Zero's PIR tool. MotionSensor(4) means the signal wire is connected to GPIO4. wait_for_motion() pauses the program until the sensor reports movement.- Choose File → Save As….
- Go to Home →
pi-projects→cat-cam. - Save as
pir-test.py. - Click Run.
Waiting for movement....Give the sensor time, then move
Many PIR sensors need a short settling period after power-up.
- After the Pi boots, leave the sensor still for about 30–60 seconds.
- Run
pir-test.pyagain if needed. - Move a warm hand or your body across the sensor's view, not directly toward it from far away.
- Watch the Thonny Shell.
Something moved.Choose the right camera cable
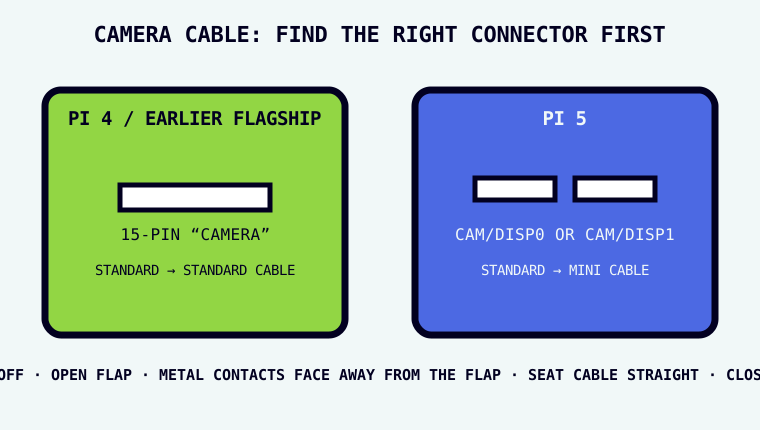
Attach the ribbon cable carefully
- With power disconnected, find the Pi's camera connector for your model.
- Gently pull the small connector flap outward until it stops, then tilt it slightly open. Do not remove the flap.
- Hold the ribbon cable straight. On the Pi end, insert it with the metallic contacts facing away from the connector flap.
- Push the cable in evenly so it is not crooked.
- Tilt the flap back and press it closed to clamp the cable.
- At the camera board, hold the camera with the lens facing down/away. Open its flap.
- Insert the cable with the metallic contacts facing toward the camera board and away from that flap.
- Close the camera connector flap.
- Check both ends are straight and firmly seated.
- Reconnect power and boot.
Open Terminal and preview the camera
- Open Terminal from the taskbar, or Raspberry Pi menu → Accessories → Terminal.
- Type
rpicam-hello. - Press Enter.
Want more time to frame it?
- Type
rpicam-hello --timeout 0and press Enter. - The preview now keeps running.
- To stop it, hold the Ctrl key and tap C. This keyboard combination is written
Ctrl+C.
If there is no preview
- Read any message Terminal shows. Do not close it immediately.
- Type
rpicam-hello --listand press Enter. - If a camera is listed, the Pi can detect it. Try
rpicam-helloagain. - If no camera is listed, shut down and disconnect power.
- Check both ends of the ribbon cable are fully inserted, straight, and the contacts face the correct direction.
- Check you used a camera connector, not a display connector on an older board.
- Reconnect power and test again.
Take one photo from Terminal
- Open Terminal.
- Type
cd ~/pi-projects/cat-camand press Enter. - Type
pwd. Check the answer ends in/pi-projects/cat-cam. - Type
rpicam-jpeg -o test.jpgand press Enter. - Wait for the preview/capture to finish.
- Open File Manager → Home →
pi-projects→cat-cam. - Double-click
test.jpg.
pwd again: the file is saved in whichever folder Terminal was working in.Create camera-test.py
- Open Thonny → File → New.
- Before running anything, save the empty file in Home →
pi-projects→cat-camascamera-test.py. - Type:
from picamera2 import Picamera2
from time import sleep

camera = Picamera2()
camera.start()
sleep(2)
camera.capture_file("latest.jpg")
camera.stop()

print("Photo saved")Picamera2() creates the camera controller. camera.start() starts it. sleep(2) gives the camera two seconds to settle. capture_file("latest.jpg") takes one picture and saves it with that exact name. camera.stop() releases the camera when this one-photo test is finished.- Choose File → Save.
- Click Run.
- Look in the Shell for
Photo saved. - Open the Cat Cam folder in File Manager and double-click
latest.jpg.
camera-test.py again, and reopen latest.jpg. It should now contain the new photo, not create latest2.jpg.If camera-test.py fails
rpicam-hello again in Terminal to separate a hardware problem from a Python problem.camera-test.py was saved. A relative filename such as latest.jpg is normally created in the program's working folder.Now make the real Cat Cam program
At this point you have already tested both difficult parts separately:
PIR works
pir-test.py detects movement.
Camera works
camera-test.py creates latest.jpg.
Now we connect those two proven ideas.
- Open Thonny → File → New.
- Save the new file first as Home →
pi-projects→cat-cam→cat-cam.py. - Then type the program on the next card.
Type, save, then run cat-cam.py
from gpiozero import MotionSensor
from picamera2 import Picamera2
from time import sleep

pir = MotionSensor(4)
camera = Picamera2()

camera.start()
sleep(2)

print("Lucky Cam is watching...")

while True:
    pir.wait_for_motion()
    camera.capture_file("latest.jpg")
    print("New photo saved")
pir.wait_for_no_motion()while True: means “keep repeating”. The program waits for motion, saves a photo to the same latest.jpg, prints a message, then waits until the motion stops before it is allowed to trigger again. Reusing the same filename is what makes the new picture replace the old one.- Choose File → Save.
- Place the camera and PIR so your test movement is inside both fields of view.
- Click Run.
- Wait for the Shell to say
Lucky Cam is watching.... - Move across the PIR's view once.
- Move away and stay still so the PIR can return to “no motion”.
New photo saved and the Cat Cam folder contains a new latest.jpg.Trigger it twice
- With Cat Cam running, trigger the PIR once.
- Open
latest.jpgand look at the picture. - Change the scene: move an object, or move yourself out of frame and back into the sensor area.
- Trigger the PIR again.
- Reopen or refresh
latest.jpg.
latest.jpg, but its picture should now be the newer one.pir.wait_for_no_motion() is inside the loop and indented at the same level as camera.capture_file. Also move the sensor so it is not continuously seeing warm movement.Make index.html
Before putting anything on the public internet, make a tiny web page on the Pi itself.
latest.jpg, and a tiny script asks for a fresh copy every five seconds.- Stop
cat-cam.pyfor a moment using Thonny's red Stop button. - In Thonny choose File → New.
- Choose File → Save As… and save the new file in the Cat Cam folder as
index.html. - Type the HTML below. This file is not Python; the browser will read it.
<!doctype html>
<html>
<head>
  <meta charset="utf-8">
  <title>Lucky Cam</title>
</head>
<body>
  <h1>Lucky Cam</h1>
  <img id="lucky" src="latest.jpg"
       alt="Latest Lucky Cam photo" width="640">

  <script>
    const luckyImage = document.getElementById("lucky");
    setInterval(() => {
      luckyImage.src = "latest.jpg?t=" + Date.now();
    }, 5000);
  </script>
</body>
</html>- Choose File → Save.
- Do not click Run in Thonny. HTML is opened by a browser, not run as a Python script.
Let the browser see the Cat Cam folder
- Open Terminal.
- Type
cd ~/pi-projects/cat-camand press Enter. - Type
ls. Check you can seeindex.htmlandlatest.jpg. - Type
python3 -m http.server 8000and press Enter. You do not need to memorise this:python3starts Python,-m http.serverasks Python to use its built-in simple web-server module, and8000is the local network “door number” (port) we are using. - Leave that Terminal window open. It is now acting as a tiny local web server.
- Open the Pi's web browser.
- In the address bar type
http://localhost:8000and press Enter.
latest.jpg. If Cat Cam updates that file, the page checks for a fresh copy every five seconds.localhost means “this same computer”.View it from another device
This is still local network only. It is not on the public internet.
- Keep the web-server Terminal running.
- Open a second Terminal window.
- Type
hostname -Iand press Enter. This asks the Pi to show its current network addresses. - Look for an address made of four number groups, often beginning
192.168.or10.. Example:192.168.1.42. - Make sure the second device is on the same Wi-Fi/network as the Pi.
- On the second device, type
http://+ the Pi address +:8000. Example:http://192.168.1.42:8000.
What is left for the real online Lucky Cam?
The important hardware and learning are complete. Public publishing is a separate system choice, and it should not be improvised inside a beginner hardware lesson.
Capture
cat-cam.py replaces latest.jpg.
Upload
A later lesson will securely send that file to a chosen hosting service.
Public page
The public page requests the newest image without exposing the Pi or studio network.